1. Adding items for export
2. Features of different types of items
3. Import of items
4. The meaning of columns
It is easy to create items by adding them in the Back Office. But you can also import them through a CSV file at the Back Office.
To import your items smoothly and quickly, the correct sheet should be prepared. You can download the template, but the best way is to create sample items in the ‘Item list’, export them as a CSV file, and add all the rest of the items to the sheet.
Let’s start by adding a few sample items in the Back Office. Open ‘Item list’.
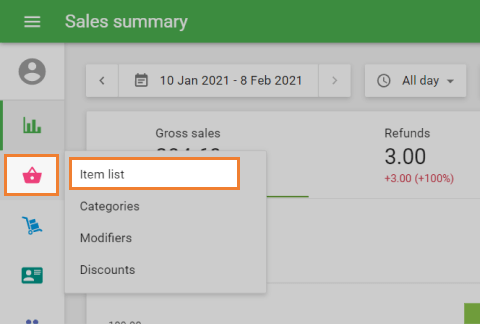
Add the types of items that you are going to use in your store: composite items, items with variants, or just ordinary items. Fill in the parameters you are going to use with your items: track stock, in stock, low stock notification, price, cost, etc.
Add categories, modifiers, and taxes and apply them to your items. If you have several stores, do not forget to add these stores in the Back Office and set the item’s availability for each store.
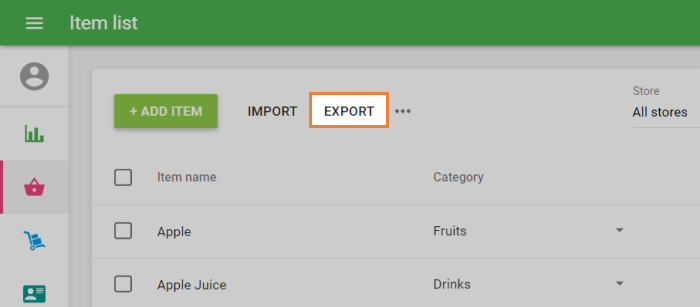
When you have a list of sample items, you can export them. Click on the ‘Export’ button.
Open your CSV file (the best way is to open it from Google Sheets, but you can also use other tools). You will see the sheet with your sample items. You can use it to add other items you intend to import. Follow the pattern of your sample items when filling in the fields.
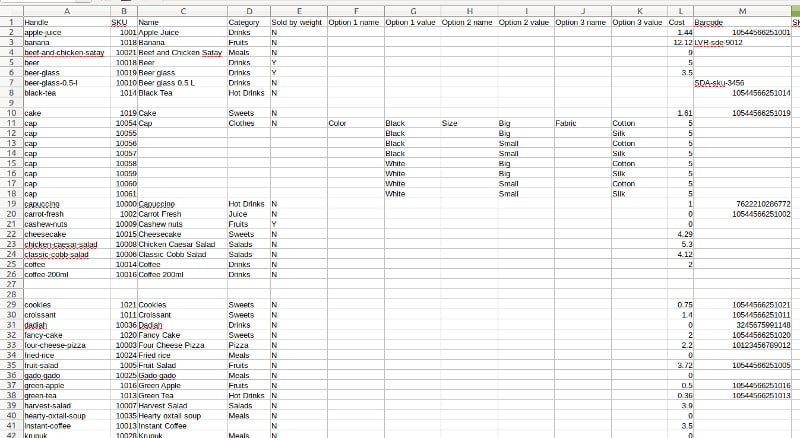
Note: CSV (comma-separated values) format is where the fields are separated by commas, so avoid commas in your data.
For fields with money value, such as ‘Price’ and ‘Cost’, use only numbers - no currency symbols. The decimal separator must be a point.
Features of different types of items
There are some specific points you have to pay attention to when adding data for each type of item: ordinary items, composite items, items with variants, and multi-stores.
Ordinary items

Ordinary items - items that are not composite and do not have variants.
For items without variants, it is better to leave the ‘Handle’ field blank in the importing file. In this case, the system will automatically generate unique handles for the new items.
‘SKU’ is an obligatory field and should be unique for each item. The ‘Name’ is also an obligatory field.
Also, leave the columns of ‘Option name’ and ‘Option value’ blank because they are for variants of items.
Leave the column ‘SKU of included item’ blank because it is only for composite items.
Multiple stores
In case of you have multiple stores, you will have the following columns for each store: Available for sale, Price, In stock, and Low stock. Each of the 4 columns will have the store's name in brackets next to it. For example, Available for sale [The Coffee] and Available for sale [Store 2]. So, you can set the values of these parameters for each of your stores.

Items with variants
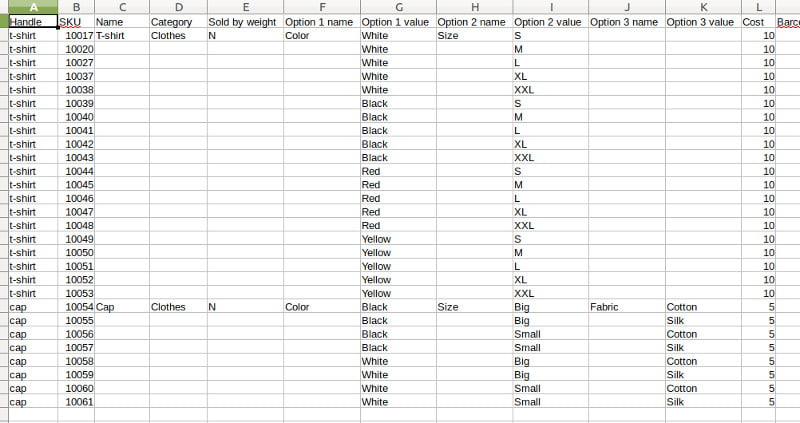
You can see that each combination of a variant in the export file is displayed as a separate item with its own SKU. Follow this pattern as a guideline for your items with variants.
The ‘Handle’ field is required for items with variants and it should be the same for all variants of the same item.
Only the fields of the first item with variants have values. The fields that are common to all variants of the same item are left blank. You may also fill them with the same value, but if they have a different value, you will get an error message when importing.
There are three columns each for ‘Option name’ and ‘Option value’. If some products have less than 3 options of variants, the extra fields are left blank.
Composite items

Each composite item includes several components. Specify SKU codes of all the included items (components) of the selected composite item in the field ‘SKU of included item’ on a separate row.
‘Quantity of included item’ - in this field, it's necessary to specify the quantity of the component that is included in one unit of the composite item.
You cannot track the stock of composite items, so leave the fields that are related to stocks blank. Also, leave all the other fields of components blank except for the first row.
Import of items
Click on the ‘Import’ button.

In the IMPORT menu, choose your CSV file from your computer and click ‘Upload’.
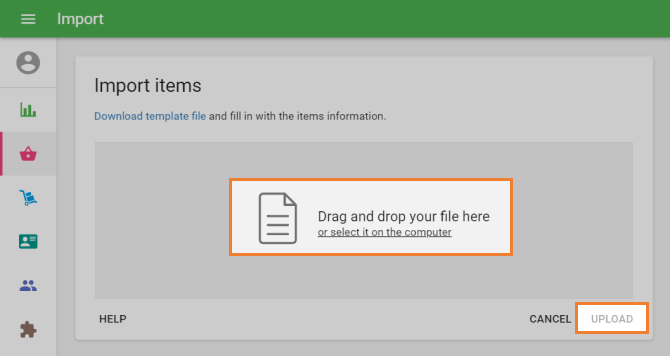
If you filled in the table without errors, you will be directed to an import confirmation window. There, you will see information on how many items and categories will be created or edited. Click 'CONFIRM IMPORT'.
You will see a notification message that the list of items has been successfully updated. Click 'OK' and continue your work.
Import errors
You may be faced with some errors when uploading the completed file. An error message will appear if:
- You changed the file format so that the file you are trying to upload is no longer in CSV format.
- The size of your file exceeds the admissible 5 MB.
- You edited the names of columns that should have been left unedited.
- You have more than 10,000 items saved in your file.
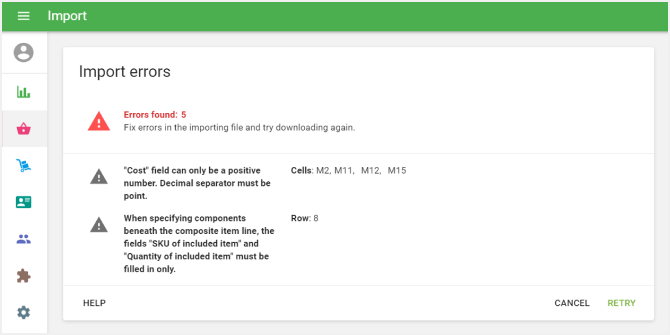
In the next stage, you may be faced with import errors. In this case, the window with the corresponding message will open.
The critical errors are marked with a red sign. Each error has its explanation message and the place of the error: row, column, and cell. Fix all critical errors in the file and try to import the file again.
Warning messages have yellow signs. They are just for your information, and they will not stop your file from being imported.
The meaning of columns
Handle
A handle is an item identifier, which should be unique for each item. The ‘Handle’ field should be the same for all variants of the same item.
SKU
SKU (Stock Keeping Unit) is a unique code given to each of your items. Specify and fill in each field individually. We recommend using the format '10001', '10002'... etc. but the key point is that no numbers are repeated. One last condition is that the SKU should not exceed 40 characters.
Name
Fill in the names of each imported item in this field. You can use letters, digits, spaces, and any special symbols, as long as you use no more than 64 total characters.
Category
A category is a group to which an item belongs. For example, if you create the items 'Cherries', 'Apples', and 'Oranges', then you can put them into the 'Fruits' category.
Description
The description field is used primarily for e-commerce and online ordering services connected with Loyverse.
Searching for an item in the Loyverse POS app by text from the Description field is impossible. This field can also be extracted through Loyverse API.
Cost
Cost is the amount of money you paid to purchase the item. Here, specify the cost of the items only using digits - no currency symbols. Do not fill in the cost field for composite items. This will be calculated automatically as a sum of costs for each individual component.
Price
In this field, fill in the price at which you plan to sell the items. As with the 'Cost' field, enter only digits without currency symbols. If you want to specify the item price during a sale, leave this field empty.
Default price
This is the default price that is assigned to all stores. But then it can be changed for some stores if some stores have a different price.
If you have the same price in all stores - you can only fill in the Default price column in the CSV file - after import, the same price will automatically be in all stores. And if prices are different in stores, then you need to specify in the CSV file the price for each store.
As with the 'Cost' field, enter only digits without currency symbols. If you want to specify the item price during a sale, leave this field empty.
Available for sale
Here, it's only necessary to specify one character: 'Y' (Yes) – if the item is available for sale, or 'N' (No) – if it is not available.
It is important to note that if you ignore this field, then the item will be available for sale by default.
Sold by weight
If the item is sold by weight, enter 'Y' in the field, and if not, enter 'N'. Again, if you do not fill in this field, the item will be sold by piece as default.
Option 1, 2, 3 name
These fields are for option names of the variants. Leave them blank for items without variants.
Option 1, 2, 3 value
These fields are for option values of the variants. Leave them blank for items without variants.
Barcode
If a barcode is available, then fill in this field with the item's barcode digits.
SKU of included item
Each composite item includes several components. Specify the SKU codes of all the included items (components) of the selected composite item here. Leave blank for non-composite items.
Quantity of included item
In this field, it's necessary to specify the quantity of the component that is included in one unit of the composite item. For example, for one portion of the composite item 'Americano with milk', you use 0.1L of the item 'Milk'. This means you should fill in the value 0.1 in the 'Quantity of included item' field nearby 'Milk'.
Use production
Here, it's only necessary to specify one character: 'Y' (Yes) – if the composite item has a production option on, or 'N' (No) – if it is off. Note, that production can be applied only for composite items and only when using the functionality of Advanced inventory.
Supplier
The primary supplier name for Purchase Orders in case of using the functionality of Advanced inventory.
Purchase cost
The cost of items that will be used by default in case of autofilling purchase orders in case of using the functionality of Advanced inventory.
Track stock
If you would like to track the inventory of a selected item, enter 'Y' in the field and if not, enter 'N'. If you leave this field empty, then it will not track the inventory of that item.
In stock
If you would like to track inventory, then fill in an item's current quantity in this field, again only using digits. To avoid confusion with units (e.g., weight), we advise specifying them in brackets nearby the item name in the 'Name' field. For example, if you have 100 kg of potato in stock, then write 'Potato (kg)' in the 'Name' field and ‘100' under 'in stock'.
If you have selected the option 'Track stock', but did not specify a quantity, then the unit will automatically be zero.
Low stock
In this field, enter the quantity at which you would like to be notified about the low stock. Notification of low stock of an item or its complete absence will be sent to the owner’s email at 10:00 A.M. in the time zone that you have specified. If there are no items with low stock, no notification will be sent to you.
Modifier - "Name of modifier"
Here, it's only necessary to specify one character: 'Y' (Yes) – if the item has a modifier, or 'N' (No) – if it is not available.
Tax - "Name of tax"
Here, it's only necessary to specify one character: 'Y' (Yes) – if the tax is applied to this item or 'N' (No) – if it is not applied.
See also:
How to Add Items in the Loyverse Back Office